Rock formation – Ibri.

Rock-formation-Ibri

Rock-formation-Ibri-2

Rock-formation-Ibri-3

Rock-formation-Ibri-4

Rock-formation-Ibri-5

Rock-formation-Ibri-6

These are from a number of images I have yet to process from a trip I took, looking for Neolithic structures near Ibri.

Most of the well known monuments (for want of a better description) are mentioned on the UNESCO site but, the place is littered with structures. Unfortunately, this being Oman, there is very little information or even road signs to guide the tourist.

I decided that I would take a short-cut through the low hills on the approach to Ibri from Muscat, mistake !

I was lost within about half an hour, lost is probably a bit strong, more a case of  ‘ha now where do I go’  GPS is no good in cases like this (It just confirms you are lost) so rummage in my map store and find an old 1970’s OS for the area. Compass in hand and good old mark one eyeball along with a quick tentative check on the fuel tank……

I did find some fascinating rock formations though and eventually arrived at my planed destination.

I digress: The Higgs boson.

Peter Higgs and Francois Englert have won the Nobel Prize in Physics for their work on the theory of what came to be known as the Higgs boson.
A Higgs particle is a boson with no spin, electric charge, or colour charge. It is also very unstable, decaying into other particles almost immediately after it pops into existence. Which is why it has taken so long to prove there is such a thing and probably the raison d’être for the Large Hadron Collider (LHC).

So what has this got to do with photography – nothing really, it’s just a passing interest that I have for Quantum Mechanics 🙂

This is a very good easy understanding of what all the fuss is about (A Video by CERN).

Today’s impromptu trip…… Halban.

Tombs at Halban: an impromptu trip that I took this morning (early 06:30 ish) well that’s early for me 🙂

 Halban is about 40 mins. drive from where I live, I was awake (don’t know why – especially on a day off ! ) so thought I would beat the heat of the day.

 Halban Tombs 2

Halban Tombs

Halban Tombs 3

Halban Tombs 4

Halban Tombs 6

Halban Tombs 7

Halban 2

Halban

A little about the tombs at Halban.

The small tombs (there are lots!) found in Oman are generally assumed to date from around the Hafit Period of (3200-2600 BC). They originally had a similar appearance to a beehive, enclosing a small chamber for burial.

Archaeologists believe that the larger tombs found at such sites as Halban, date from the Umm al Nar period in the Bronze age, circ;  2700-2000 BC.. The Umm  An-Nar Culture is one of the most important periods in neighbouring UAE, notably Bahrain.

See this link for more:

.abudhabi.ae/egovPoolPortal 

From archaeological evidence it is suggested that trade in copper with Mesopotamia and the Indus Valley gave rise to the wealthy land known as Dilmun, thought to be in Bahrain. Obtaining copper from the Land of Magan, now largely identified with the ancient copper mining areas in Oman and the adjoining area of UAE. The presence of copper ore in the hills near Halban again points to the link with copper and an Umm Al Nar period.

During the early 1950s, Danish archaeologists excavating grave mounds in Bahrain, found 4,000-year-old settlements and temples thought to be Dilmun, known as the city of the gods in ancient Sumerian literature. Their 1959 discovery on the island of Umm an-Nar near Abu Dhabi of another, previously unknown culture contemporary with Dilmun was unexpected. At this site an outer wall enclosed circular graves, between 15 & 40 feet in diameter with a tower like appearance; in which as many as 25 to 30 people could be buried.

Encouraged by the discoveries at Dilmun and Umm an-Nar; Danish archaeologists excavated 200 single-chambered burial cairns near Jebel Hafit on the Oman-United Arab Emirates border. Here they discovered a culture earlier than both Dilmun and Umm an-Nar. Excavations yielded jars with geometric designs painted in black, white, and dark red, copper and bronze pins along with stone beads. The jars were the same type as used in southern Mesopotamia around 3000 B.C. One problem though; unfortunately there seems to be little trace of the ancient settlements that should accompany these tombs.

The Umm al-Nar tombs are circular and their outer walls were faced with well-shaped smooth stones in a spiral construction. Internally they were mostly divided into a number of chambers, these being used for collective burial. Probably by a family group or members of the same community; who would use them for several generations.  In some, archaeologists found the remains of more than 100 people buried in one tomb.

In Oman these tombs have only recently been ‘investigated’ by the outside world (1991 or there about) although when one asks the locals, they will tell you they have always been there and if lucky, will follow this up with “would you like to see some more”………

Obtained from the Web and various publications I have; therefore any errors in the above are down to me………

More links:

uae.com/timeline.html

New Portfolio Archive.

I am in the process of up-dating my archive images (long over due ) the first is now done:

Portfolio Archive for 2013 No1.

Far better presentation than the old ones – maybe I know a little bit more about what I am doing than before….. 🙂

I have also been using L/R for jpg export, with a copyright notice; all very easy when! I take the trouble to actually look how it’s done. Unfortunately, computers are not one of my favourite items. Many a time it has almost gone out of the window due sheer frustration.

Wadi Bani Habib Village.

Jebel-Village-tonedAnother from the ‘Jebel Village’ series I am printing at the moment. (Nikon F4 – Ilford HP5 plus in D76 @ 1+3) Print on Ilford FB Matt & toned in brown toner.

Bani Habib Village Jebel Akhdar – there are remains of at least three villages along this stretch of wadi, with the fourth (newish) being further along on the right from where this image was made.

The village depicted, along with another unseen  on the left of this one, had prominence during the  Jebel Akhdar War in Oman between 1954-1959. Remains of 1950’s ammunition boxes can still be found; along with 303 rounds and other odd bits of detritus left over from that campaign.

Thinking and process behind ‘New interpretation of an old negative’

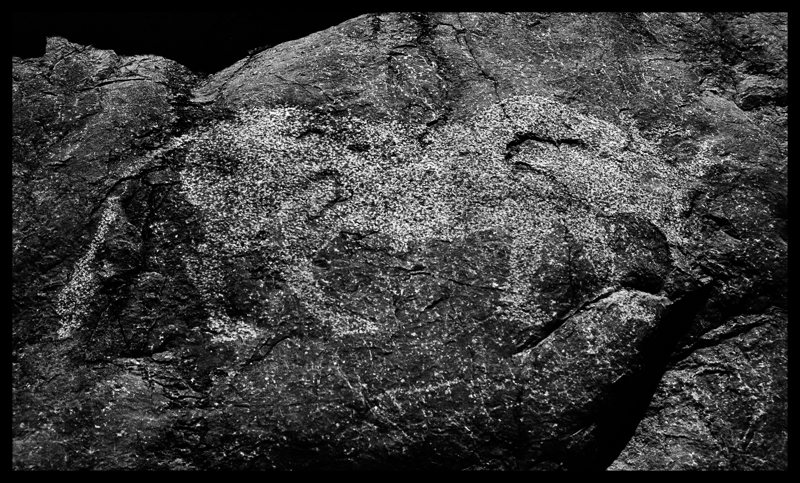
I thought it may be of interest to some, if I explained my thinking and process behind this image.

Trees-toned

It all came down to the light meter I used and the fact that I had only come equipped with Ilford HP5 plus, although in this case, that film being an old style emulsion, helped when developing.

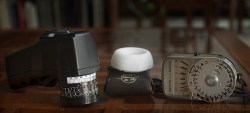
Reflected light meters – the type found in every camera, measures the light reflecting off the subject. There are also hand-held reflected light meters like the type I use (Pentax Spot & Weston Euromaster) see this link for the Weston, almost a work of art: WestonMaster

Pentax-&-Weston-Meters

The Pentax is now unfortunately, no longer made and the second-hand price is a bit silly.

Spot meters measure the light reflecting off a very small part of the scene and in the case of the Pentax it’s 10.

Because dark objects reflect less light than bright ones a reflected light meter can be fooled by an unusual subject or background. With the spot meter this can be avoided by it having the ability to select a very precise point in the image.

This is also where the Zone system comes in to play, as one can then decide exactly where to put that point on the scale I to 10  (10 being paper white and 1 being max black)

The Weston just takes an average reading and so is nowhere near as accurate as the sophisticated metering of today’s cameras. I only use the Weston for incidental readings.

Incident light meters measure the light falling on the subject so is not influenced by the subject’s reflectance. Many hand-held meters can measure both reflected and incident light and are identified by a white translucent dome which can be fitted over the light sensor.

This type of meter is used to get the most accurate readings possible to determine a successful exposure. In particular, hand-held meters are valuable in more difficult light areas, including situations that involve a great deal of difference between the light on the subject and that of the entire scene.

Incident meters give the photographer much more control over the light measured and then being able to deciding what exposure is best for that particular subject. The purpose of an incident meter is to measure only the amount of light falling on the subject, they are designed to minimise the influence of background light. Thus, whether the subject is close or far, the exposure of that subject will be equal in all situations, providing a more natural and consistent colour, contrast, and depth.

By measuring all the light in the field to determine brightness, incident meters are able to adjust for wide contrasts in the scene. The image produced using this method will be a much more precise representation of the subject’s appearance.

The only major drawback to incident metering is that it requires the photographer to gather measurements in a most precise way; the incident meter reading must be taken in the same light that the subject is in. That means that the meter must be facing the camera so that it sees the light falling on the subject, not that which is reflected from the subject. That my friend is where the reflective meter comes in to its own.

Reflective meters as found in all cameras, measure the light in the field of view as reflected from the subject. Using this measurement to create an average value, these meters provide a recommendation for the correct exposure of that image. But in the case of my image, that was never going to work as the range of light exceed the ability of the film to capture it; I also needed some of the subject to be ‘just down from paper white’ not grey which is why I used a combination of both metering methods.

They are most effective when used in ordinary lighting situations, where the subject does not stand out from the general scene in terms of light values. This is because reflective meters do not have the capability to compensate fully for very light or dark subjects in the same scene. Snow for example will become a dull grey because the meter has not been able to accommodate the extreme reflectance and so has set it to an average value; modern cameras are very much better at dealing with subjects like this but, remember those blocked-up high lights 🙂   (A correction: this should read ‘blown highlights’ me getting negative terminology mixed with digital were the negative would be totally black giving paper white the exact opposite with digital – thanks DH)

All the above is only the start of getting a good image printed and displayed on your wall and with luck, someone else’s……..

Developing the film or using ‘Lightroom’ along with the chosen paper, all play a part in the process and I may just get around to that in another post.

Some may have noticed the grey scale attached to my Pentax meter’s exposure dial, it is an addition that helps me determine what adjustments to make when using the zone system.  More details on both can be found by reading this book: see link here:  Way Beyond Monochrome

Now for the reason why I have been stepping outside my comfort zone.

The posting of ‘New interpretation of an old negative’ gave me a lot of trouble both when taking the image, and more to the point when scanning for this blog.

I was out camping in the mountains and as is my want, decided to stay overnight near where this was taken, precisely because I thought I could make this photograph in the early morning light. But, no infra-red film…….

With good exposure control (I hope 🙂 ) and a compensating developer (more on that another time) I thought I would be able to capture the glow of the light in among the trees. Printed on Matt FB paper and toned, I was very pleased with the result. But my scanner and more to the point my skill using it, gave me grief because of the limitations inherent with B&W negatives and the way the scanner works. So unfortunately what you see is not the best representation of this photograph, but near enough for government work as they say.

New interpretation of an old negative.

Trees-tonedNew interpretation of an old negative previously posted.

I have been working on a re-print of this negative. One of the advantages of scanning negatives is the ability to play around with them before printing in the darkroom.

Previously it would take several prints and sometimes many hours working up to a final print. Now, if I have an idea about a negative, I can scan and play in Photoshop, I then make notes and go for it in the darkroom, without wasting paper (that paper now being VERY expensive compared to only a few years ago)

Pre-visualisation is not always the final interpretation: look at the number of changes Ansel Adams made to Moonrise Hernandez New Mexico.

He is still one of the major contributors to B&W photography, even if he has joined the ranks of those that seem to be denigrated by some these days.

His Zone System is about the only way to get good exposure in difficult light; especially combined with a spot-meter. If you don’t believe me then remember all those blocked-up high lights (err ‘blown highlights’ in the digital world 🙂 ) that cannot be controlled in Photoshop. Yes, sometimes it is unavoidable, but in most cases they can be controlled at the point when the image is made.

The above image is not made on IR (Infra-red film) it’s Ilford HP5 @ 320 in Microdol-X @ 1+3.

Another Door.

Decorated-doorNikon F2sb. Tokina AIs 35-70  AT-X f2.8 Tri-x @ 400 in D76 1+1.

Another one of those images that I could not find a straight area that looked good – so gave up and used the steps and no I do not have a ’tilt & shift’ lens.


I did a print of this negative back in about 2010; but recently I have been working on a new print that has been ‘painstakingly re-touched’ with spotone retouching dyes.

I never liked the mains cable down the left-hand side of the door on the original and  think the owners would have been a little miffed if I’d removed it  🙂            This could have easily been accomplished with Photoshop but……… back in the days when there was no such thing, the only way to remove distractions from an image was using retouching inks.

The technique was very simple in theory; mix the ink to the required colour and with a small artists brush, apply to the print using only the very tip of the brush, dotting the dye onto the paper.

But theory is great until one puts it into practise; it requires a good sable hair brush (the best for holding liquids and obtaining a very fine point) an almost dry brush and lots of patience!!!

If done correctly it is almost indistinguishable from the surrounding area of the print; not possible with colour prints I might add. Ilford Matt or semi-matt fiber papers are my medium of choice because they absorb the ink rather than it sit on the surface. These dyes came in sets of six pre-mixed colours which used together gave an infinite range of shades. Unfortunately (that word again) they are no longer available but, Ansel Adams in his book ‘The Print’ mentions Edward Weston used an India ink and gum arabic mixture. I have modified this slightly by using the Japanese ink blocks which are available in a variety of colours, mixed with gum Arabic and distilled water; it works very well. So when my inks run out I will use this method instead.

Now all this may be an anathema to the purists among you but, I am not making ‘documentary’ images.